There's never been a better time to take up lacto-fermentation as a hobby. With fresh vegetables becoming scarcer as the COVID-19 crisis affects the food supply, it makes sense to stock up on what you can, and preserve what you can for what may be even scarcer times ahead. If like me, you live without a fridge or freezer, it's even more prescient need. Man shall not live on toilet paper alone. But even if you don't, it's something I recommend. You will need fresh vegetables, salt, and some jars with tightly screwable lids.
 |
| Various fermented and pickled plants, wot I did myself. (Also pictured: herb salt). |
Sea or otherwise fancier-than-simple table salt is best, but not essential. More or less any vegetable will do; and for jars, I'm working my way through standard sized pasta sauce jars, squirreled away from the times when you could just buy pasta in the supermarket, boil it and plonk some sauce on. Remember those times? Good times they were. Or maybe they weren't. Maybe these are the good times.
After wild garlic, which isn't available yet, my favourite vegetable to ferment is carrots. I think this approximates to something the Koreans call "kimchi" but I'm not going to pretend I know what I'm talking about there. What I do know is that if you immerse thinly sliced vegetables in salt water and tightly seal them into an anaerobic environment, you'll probably end up a few weeks down the line with a healthy and delicious snack/condiment/sandwich filler/impressive looking shelf. Here's how I do it:
1. Top and tail your carrots and in half. Then slice the halves vertically in half. Then slice those halves vertically and as thinly as you can into matchstick-sized pieces.
2. Add 2-3 generous teaspoons of salt to a jar and fill about a third of the way with water. Put the lid on and give it a good shake to dissolve the salt. This is the "brine". If you have some leftover brine from a previous jar, you can add a few dribbles of this to the new brine to give the fermentation process a kickstart. If you haven't, don't worry about it.
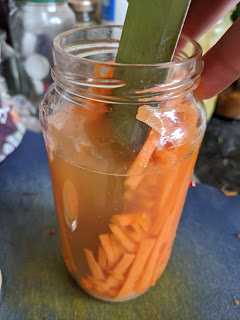
 |
| It's OK, that's what it's meant to look like. |
3. Pack the carrot matchsticks, or whatever veg you're using, into the jar as tightly abundantly as possible. If you're using leafy veg like spinach or cabbage, squash down with a spoon each time you add more to press out as many air bubbles as you can. (Remember, you want an anaerobic environment for the chemistry to work properly). When I'm doing carrots, I drop them in and push them against the sides of the jar with the knife I used to chop them, to make space for more, until there isn't any.
4. When the jar is fill, top up the water to the brim and seal the lid as tightly as you can. With any luck, within a couple of days the pressure will start to build up inside the jar, and the lid will give very little when you push down in it. This indicates the fermentation is working, and you may need to "burp" the jar. You can do this by levering/prising the lid with a blunt knife between the lid and the jar to allow some gas to escape. After a few weeks, this will all settle down and you can leave the jar as it is, on a shelf or perhaps in cupboard, until you're ready to snack.
You can tell if the ferment has worked by opening the jar and smelling it. If it smells disgusting, it's spoiled, and you shouldn't eat it unless you're a fan of food poisoning. But if it fizzes and smells potent, but pleasant, you've got yourself a real treat. Experiment, be a bit careful, and enjoy!


Related posts
Wild Garlic Experiments
Fermented Garlic Report
Give (Lacto-Fermented) Peas a Chance
Please consider disabling your adblockers when reading this site. I make every effort to ensure no inappropriate, rubbish or offensive advertising appears here, and nothing that is contrary to the spirit of this blog. So it's really nothing to be afraid of. Cheers.


Comments
Post a Comment
Your comments are welcome.